I'm struggling a bit with Blogger. I haven't given myself the time to really learn it, and I'm starting to notice the differences. There are a lot of little things that I need to learn how to do to my blog.
In no particular order:
A new background!
A list of the blogs I follow, listed like in Google Reader is fine with me.
A way to cross index my posts.
Hmm... yeah, okay, that's about all.
I JUST figured out that I could add all of the Blogs I follow to Google Reader, therefor reading, and tracking, them wherever I go with my tablet. Before that I checked all six dozen of them by checking them in Fire Fox... It let me track which ones I'd read, so if I hadn't fallen behind it wouldn't take long. The problem was that I could ONLY keep up at my desktop at home. It didn't work out so well when I was gone for any reason.... I actually started going through withdrawals on a longer trip I took earlier this year.
Seriously, I missed y'all enough that I was going nuts.
Please don't laugh. It was rough.
Now I know I have the ability to track everything from any workstation, including my Xoom. Functionally this means that anywhere in the world I have Wi Fi access I'm in good, geeky shape!
In the meantime... back to learning about Blogger....and reading Wikis for games.... Hopefully more of the former than the latter....
Thursday, June 28, 2012
Sunday, June 17, 2012
A miniatures zombie contest
Morbious, over at Showcase Terrain is running a zombie diorama contest. I love the premise of this, as I do the other one I mentioned today. I like how the two are so different, and are both so effective at helping to create a sense of community within this great group that happens to scattered around the world.
For anyone that might be interested in jumping into a friendly competition to create a zombie miniature diorama (built onto a cd) go here: http://www.showcaseterrain.blogspot.com/p/contest-registration_6123.html
I'm looking forward to this!
For anyone that might be interested in jumping into a friendly competition to create a zombie miniature diorama (built onto a cd) go here: http://www.showcaseterrain.blogspot.com/p/contest-registration_6123.html
I'm looking forward to this!
Contest by Gunners Wargaming Blog
The original post can be found over on Gunners Wargaming.
I think this is BRILLIANT. I love the spirit of generosity that I SO often find within the wargaming community. This idea will net him new followers AND let him do something cool for another gamer out there.
In the age of internet trolls and jackasses causing trouble everywhere, it's the wargamers as a whole that seem to be holding the line at civil community discourse. For the most part I've found them (especially in the blogosphere) to be incredibly generous with time, support, advice, and encouragement.
This contest, and another that I'm signing up for, really make me excited about blogging, and as a newbie here, I need that!
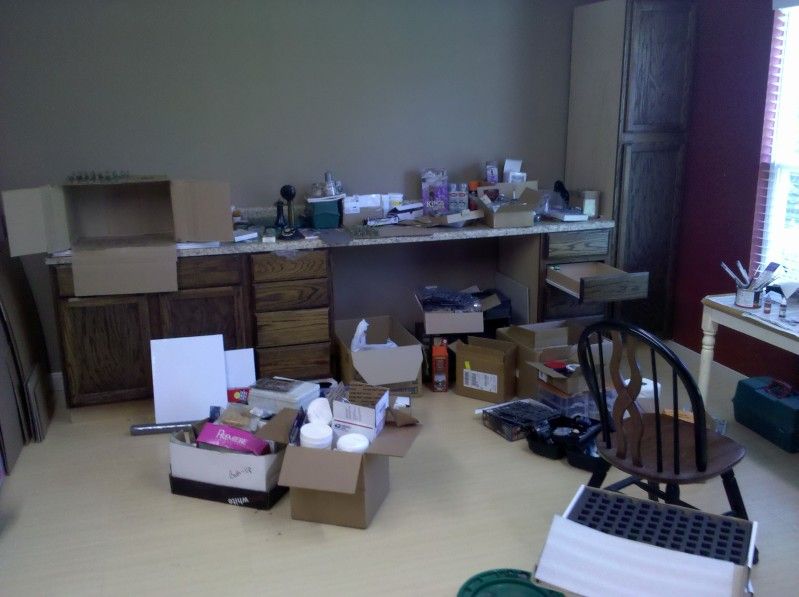
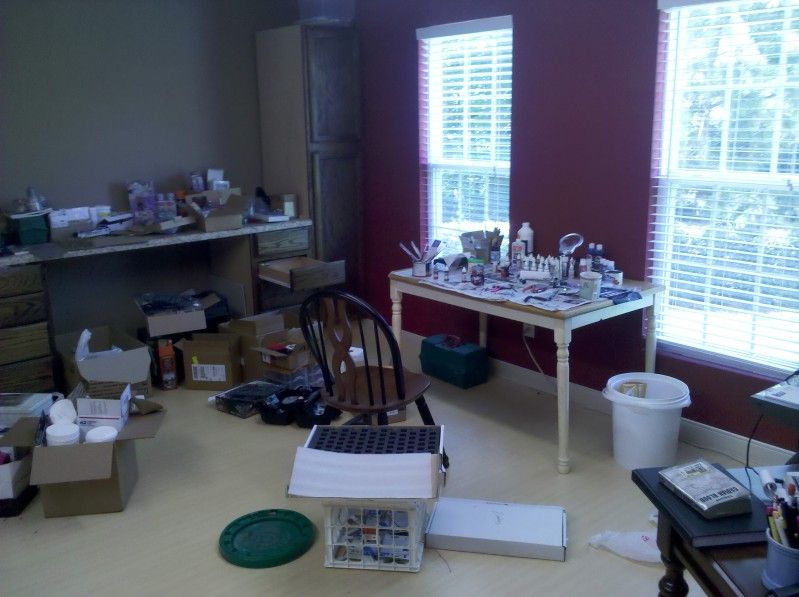
Work Space and Work Flow
Most of my progress with miniatures this past week was in the realm of my work area. For two years in this house (living with my parents while I go to school, I'm INCREDIBLY grateful to them for the chance) I have tried running my hobby from my computer desk....and from piles all over my room. Eventually I just got swamped, and couldn't even function. After a couple of conversations with my parents (that resulted in their permission to do this!) I took over the art studio area of their basement.
So, I've spent a bit of time digging out the floor of my room (not done yet!) and getting stuff into that new (to me) space.
So, I've spent a bit of time digging out the floor of my room (not done yet!) and getting stuff into that new (to me) space.
I have a while to go to get it completely organized... I got to the point that I realized I had a LOT of really cool stuff, and no way to do anything with it. This gives me the chance to do so much more!
The plan is for the extra space, especially in storage capacity, I'll be able to work smoothly enough to actually become productive in hobby terms! It seems to be working pretty well so far. With moving down into the basement still, there's not been as much hands on hobby time as I might like. I see that time as an investment, it's only going to help in the long run.
On the work list, in no particular order, I have:
A Collodi themed supply wagon, built on a 50mm base) for Malifaux. It's used for a specific strategy in the game, and eventually I want supply wagons that are themed for every Master/Henchman that I play.
A 40K Techpriest and Retinue for the Rogue Trader RPG campaign I'm playing in.
GW LoTR evil force. I'd like to hammer an Angmar force out of it, we'll see where this goes.
Orks and Grots. I hope to use these for Gorka Morka!
GW Fantasy Ogres. These will be used for either Mordheim (there are some great community rules for Ogre warbands) or converted into combat servitors for my Techpriest.
GW Fantasy Empire militia box. This should get converted into another warband for Mordheim.
A handful of Skaven stuff, a lot of it older metal figures. Again, this will be for Mordheim.
Mixed manufacturers horror miniatures. These will be for Gothic Horror games. As of now I plan to use them for Chaos in Carpathia.
Mixed Egyptianesque miniatures, mostly from GW. These are going to be used for Chaos in Cairo.
Lead Adventures Miniatures VSF collection, almost complete. Combined with Ramshackle Games Brass Coffin (x2), their gasmask conversion heads, and Wargames Factory British from the Anglo-Zulu Wars, this will be the core of a Steampunk British Force.
Errr.... There's more....like a lot of us in this hobby, I collect and collect....
Yeah.. As so many of us have said, I need to get better about building and painting!
I hope things are going well for you! Thanks for checking it out.
Monday, June 11, 2012
Horde pt 2
I realized, while adding some detail to the models in my zombie horde, that the Wargames Factory model detail really IS incredibly shallow. I don't think it's a bad thing at all. I think it just requires planning to deal with painting.
If dipping, with any of the commercial products or homemade recipes, be sure to thin it to ensure you don't lose detail. Again, I would suggest using rubbing alcohol to thin the mix down to allow it to flow off of raised surfaces. Losing this detail wasn't an issue for me as I expect that horde as a mass is still pretty impressive looking on the table.
If painting be sure to use thin coats! I know people say this ALL the time, it really is true. Don't glob paint all over any model, and it will look better. With these models this is possibly even more critical as you can lose detail so quickly.
You have to be careful even with drybrushing. If you rub your brush across the model the same as you would on a high relief model you could quite easily put your pigment into crevices that you don't want to have color.
If doing LOTS of models, definitely work in batches. This isn't specific to that company's product, it was just reinforced today how helpful I find this to be.
Sunday, June 10, 2012
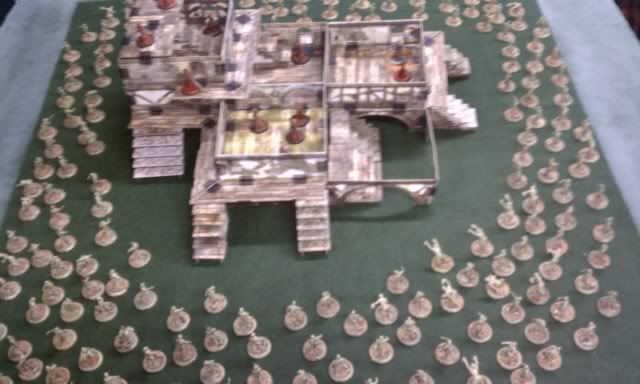
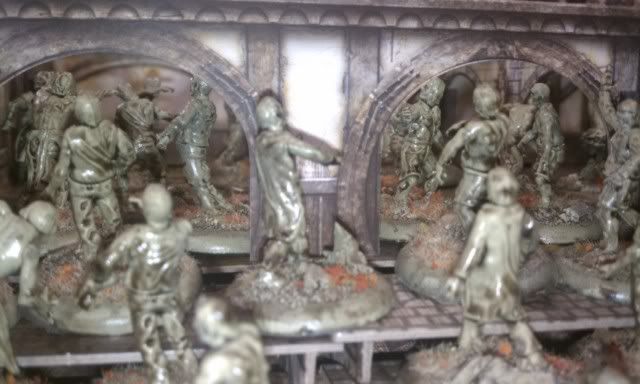
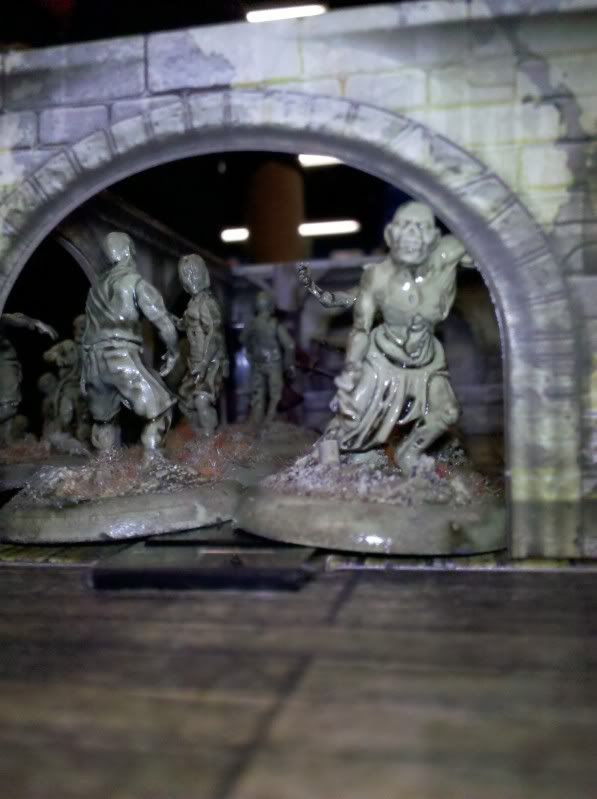
Sometimes you just need a horde of zombies....
..and fast!
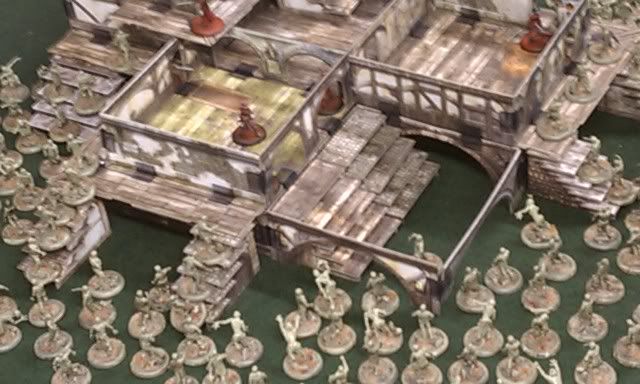
This is a record of how I built one (with a little help from some friends...) last year in time for a special event. I needed something that looked like this:
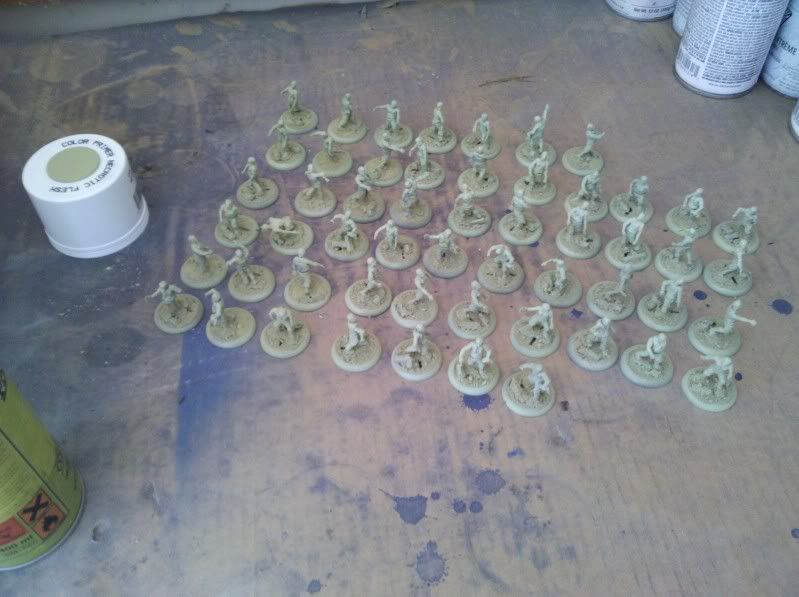
I started with a pile that looked like this:
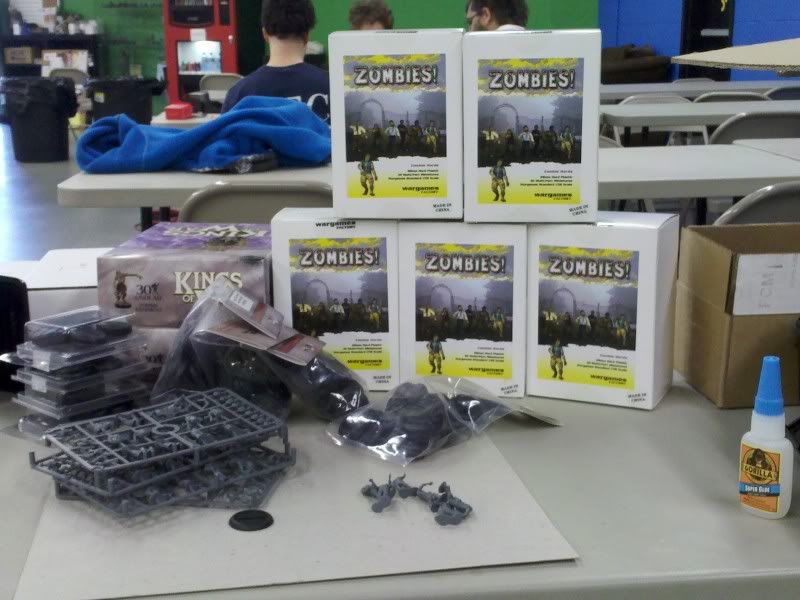
There were 240 zombies in the boxes and on the cardboard in that picture. There were also a comparable amount of 30mm bases, which were necessary for the game system I was going to be using for this event.
What really helps me to finish this sort of thing is to break things down into the smallest tasks possible, and to track my process. At the beginning it feels like I have an unconquerable mountain ahead of me, by the time I really start into it I'm pretty excited about every little milestone.
I started by deciding to work one box at a time. I thought it would help keep me as organized as possible. It turns out I was right, and I'm glad I did it this way. Each box, in turn, was snipped from the sprues, cleaned up, and glued together. I even systematized the building. I glued legs down to the bases, bodies to legs, arms to bodies, then finally, heads to bodies. By the time I finished each body part the first models down were okay to be handled. I used a plastic weld for this, as I wanted the solid bond between the pieces. Eventually I stopped at 180 zombies built. I figured it was enough for my purposes, and I have to admit, I was sick of looking at them by that point.

Then started the basing! Like the assembly a lot of this was done at my computer desk, watching simple science fiction shows that I could only half pay attention to, and be okay with. I believe at this point it was Stargate, possibly the Atlantis series. Each model had some sand (lifted from the local volleyball court in the neighborhood park) mixed with a tiny bit of chopped sprue.
At this point (a couple of days into the project) I ended up in the garage of a friend, ready with Army Painter's Necrotic Flesh, as well as their Dark Shade (black) dip. I started spraying, using a box as a booth, batches of zeds until the whole lot were complete.
After letting the entire little horde dry a while we started a two person assembly line to dip these guys. Rather then go through the entire mess I think it might be best to point out what I learned!
1. Thin the dip a bit with rubbing alcohol. Before we did this the dip wouldn't flow off raised surfaces very well, and made the entire model look..... gummy? I'm not sure, it was just too thick on the surfaces to look correct to my eye.
2. Spin each and every model. Seriously, this in itself was liquid miracle that made the whole process worthwhile. We used a GW clear flying base inserted into the business end of a household drill. We used poster tack to affix the model to the bottom of the base, and gave them a quick spin. The entire assembly should be covered over by a heavy brown paper bag. Otherwise you're in for quite a mess. We ended up swapping the bag for a new about halfway through the horde, that's how much extra stuff came off.
3 Mix colors! We ended up running low on the dip. We poured in a bit of a dark red, cherry stain into the black, also adding in a bit more rubbing alcohol to ensure it flowed properly. It gave a bit more color to the model. A pure black often sucks the life out of whatever you happen to be working on, yet adding in a tiny bit of another color makes it really pop. I learned this trick in a painting class years ago, and apparently my instructor learned it from a printer, that always adds yellow to his black.
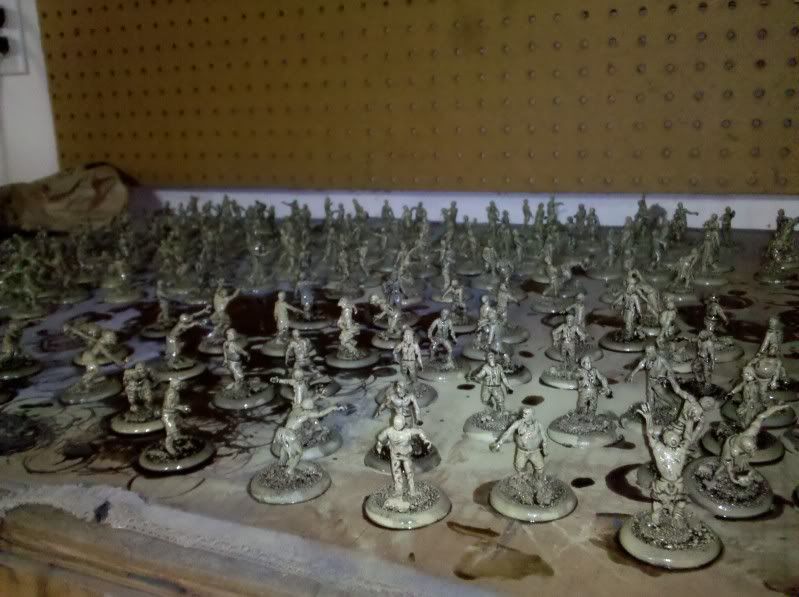
Each model then had a bit of drybrushing, both on the model and the base. There really wasn't much done to them in this case. It was just done, mostly in the same tones already used, to bring a couple of details out. Then a small amount of white glue was painted on to each base, which was immediately dipped into a mix of flock and static grass, then tapped off to ensure the loose stuff came off. Incidentally this seemed to help lift the static grass up and down, rather than just laying over on its side.
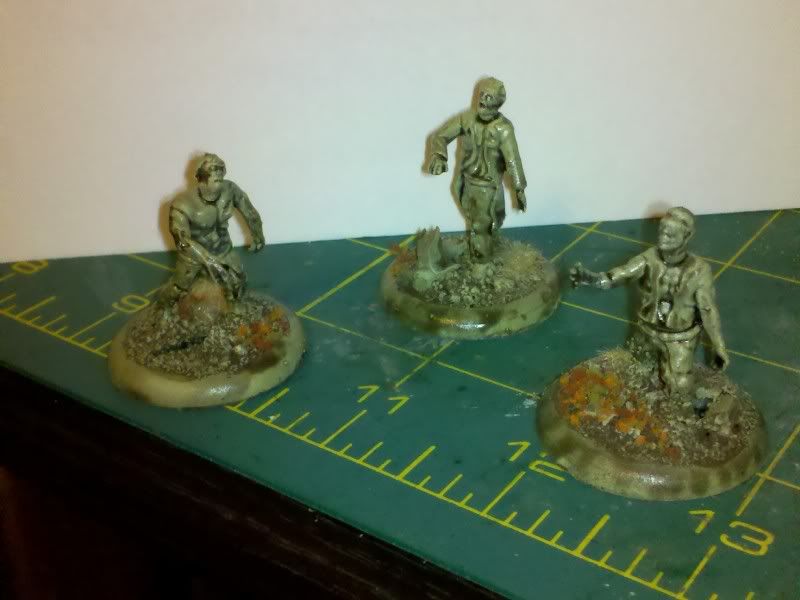
At this point I called them good! There is still some work to be done on them, little things that I want to do to make them stand out a bit more. For a horde of zombies done in less than a week, I feel pretty good about them.
For anyone out there reading this....what would you add to them? I'm not willing to strip this lot down in order to add a lot more color, and painting over the dip would probably not yield great results. Any ideas?
Have any of you speed built a zombie horde? How did the project turn out?
This is a record of how I built one (with a little help from some friends...) last year in time for a special event. I needed something that looked like this:
I started with a pile that looked like this:
What really helps me to finish this sort of thing is to break things down into the smallest tasks possible, and to track my process. At the beginning it feels like I have an unconquerable mountain ahead of me, by the time I really start into it I'm pretty excited about every little milestone.
I started by deciding to work one box at a time. I thought it would help keep me as organized as possible. It turns out I was right, and I'm glad I did it this way. Each box, in turn, was snipped from the sprues, cleaned up, and glued together. I even systematized the building. I glued legs down to the bases, bodies to legs, arms to bodies, then finally, heads to bodies. By the time I finished each body part the first models down were okay to be handled. I used a plastic weld for this, as I wanted the solid bond between the pieces. Eventually I stopped at 180 zombies built. I figured it was enough for my purposes, and I have to admit, I was sick of looking at them by that point.
Then started the basing! Like the assembly a lot of this was done at my computer desk, watching simple science fiction shows that I could only half pay attention to, and be okay with. I believe at this point it was Stargate, possibly the Atlantis series. Each model had some sand (lifted from the local volleyball court in the neighborhood park) mixed with a tiny bit of chopped sprue.
At this point (a couple of days into the project) I ended up in the garage of a friend, ready with Army Painter's Necrotic Flesh, as well as their Dark Shade (black) dip. I started spraying, using a box as a booth, batches of zeds until the whole lot were complete.
After letting the entire little horde dry a while we started a two person assembly line to dip these guys. Rather then go through the entire mess I think it might be best to point out what I learned!
1. Thin the dip a bit with rubbing alcohol. Before we did this the dip wouldn't flow off raised surfaces very well, and made the entire model look..... gummy? I'm not sure, it was just too thick on the surfaces to look correct to my eye.
2. Spin each and every model. Seriously, this in itself was liquid miracle that made the whole process worthwhile. We used a GW clear flying base inserted into the business end of a household drill. We used poster tack to affix the model to the bottom of the base, and gave them a quick spin. The entire assembly should be covered over by a heavy brown paper bag. Otherwise you're in for quite a mess. We ended up swapping the bag for a new about halfway through the horde, that's how much extra stuff came off.
3 Mix colors! We ended up running low on the dip. We poured in a bit of a dark red, cherry stain into the black, also adding in a bit more rubbing alcohol to ensure it flowed properly. It gave a bit more color to the model. A pure black often sucks the life out of whatever you happen to be working on, yet adding in a tiny bit of another color makes it really pop. I learned this trick in a painting class years ago, and apparently my instructor learned it from a printer, that always adds yellow to his black.
Each model then had a bit of drybrushing, both on the model and the base. There really wasn't much done to them in this case. It was just done, mostly in the same tones already used, to bring a couple of details out. Then a small amount of white glue was painted on to each base, which was immediately dipped into a mix of flock and static grass, then tapped off to ensure the loose stuff came off. Incidentally this seemed to help lift the static grass up and down, rather than just laying over on its side.
At this point I called them good! There is still some work to be done on them, little things that I want to do to make them stand out a bit more. For a horde of zombies done in less than a week, I feel pretty good about them.
Have any of you speed built a zombie horde? How did the project turn out?
Thursday, June 7, 2012
The future of this blog...
Wow. I really need to either shit or get off the pot when it comes to this blog.
I read just over sixty blogs myself, and love every one of them. Some, like VampiFan's and From the Warp's are just amazing, in very different ways. I always look forward to seeing updates to ANY of the blogs I follow, maybe even more so about these two.
With that said. I'm going to run with this blog. I'm shooting for Sunday updates, and this next one is, as they say, in the can!
Subscribe to:
Posts (Atom)